My name is Terrell Masters. I was recently studying Information Technology at Tec-NQ. I am interested in IT in a whole but am most fascinated in software development and how different programming languages work and what advantages they have. I would like to explore how to better use them in a project to create an app or game that I enjoy making and that others could enjoy using/playing.
At work experience one of the main things that happened was putting together desktop computers and installing windows on them. I began with putting the backplate into the computer case and slotting the motherboard into it and screwing it into the case. I then proceeded with putting the cpu and the cpu fan onto the respective location in the center of the motherboard. When the fan is being inserted you must line it up with the holes and then push in the four pins on each corner of the fan which will cause them to spin and lock in place in the hole. The next step was inserting the sticks of RAM into the designated RAM slots. To put the Ram into the sid slots you line up the correct pins in the slots and then push down until you hear two clicks and the top and bottom clips click inward where it will be secured in place. After this i inserted the graphics card but before I did that I must push out the panels in the case to allow the graphics cards ports to be visible. Inserting the graphics card is similar to the RAM where you just push down on it until it clicks. The next thing to put in was the CD drive which to do this i removed the panel from the case and inserted it from the exterior into the case. Next i inserted the designated hard drive into the slot and screwed it in to secure it in place. Finally I inserted the power supply into place and then plug the respective cords into place. All of these components were supplied by The Computer Guy and i was given instructions when needed.
This unit was personalized as we did not all do the same game and i had already begun to make this game before instructed to by my facilitator. When i began with this game i had little to no clue how to begin this project. So I began with getting the basic controls down where if you click the left and right arrow keys it will rotate a platform that a ball will roll along. This is where the first issue came into play as when i coded the controls i rotated it using the transform.rotate parameter which caused the player/ball to not gain velocity when the platform is rotated causing it to drop immediately after leaving the platform. After some troubleshooting I changed the code to use rigidbody torque to rotate the platform instead which allowed the ball to interact as intended. In the beginning i began to make levels to play that you would reach the end of and go to the next level but i soon found that this would be ineffective as i would have to constantly update the game with new levels. So I decided to learn procedural generation with the platforms. I coded it so that there are two empty gameObjects that constantly compare their distance to each other and when they are a certain distance away from each other create a new platform and move one of the points to where the next platform would be created. I quickly found that i had an error as it caused the platforms to infinitely spawn in one spot and cause errors. This was because when i was trying to access the variables of the created platform i was accidentally creating a new platform which caused a feedback loop that created many platforms. I fixed this issue and then made it so that the platforms would go up or down a random distance when created unless it is close to the lava that is acting as a death barrier in which it would only be able to go up to avoid the platforms going into the lava. I coded a restart scene function that when you touch the lava the camera will stop following the ball and then after 3 seconds it will restart the level. I also created an empty gameObject that if an objects x position is less than the empty gameObject to destroy the object that passed it to avoid having hundreds of platforms at once. Next i wanted to have persistent saves that continue when you re open the project and for that I learned how to write variables to a text file upon death or quitting to the persistent data path and then load said save on the start of the level but only try to open the file if the file exists otherwise there would be an error. In this save file i began with saving the high score, the coins, and the boolean to toggle the particles. I then created a pause button that causes the time scale to go to zero simulating the game pausing and then setting it back to 1 when the button is pressed again. I then created a menu that would appear when paused that has a restart button to respawn, an options menu that at the time only has the particles toggle, and an exit button to quit the application when it is built. On the platforms i created a script that will pick a random value between 0.0 and 1.0 and if it is above a certain value to spawn a coin above it. The coin however had an issue as the animation component used world space for position and so i had to make it spawn under a parent to avoid it going to 0,0 in the world space. The platforms also had a boolean on them that upon the player touching them would disable the boolean and +1 to the score but when the boolean is disabled not to do anything.
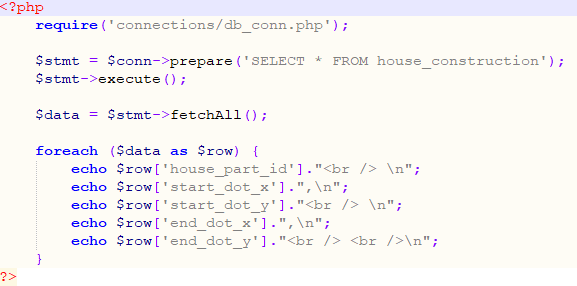
The purpose of this unit is to create a database that allows us to enter coordinates into the database and use them to draw up things such as house plans by accessing the data. For this exercise we will be needing to use notepad++ as well as xampp control panel running apache and mysql to access phpmyadmin on a local host address. The first step is to start up xampp and start the apache and mysql procedures and open up phpmyadmin on the browser. We created a database with two tables that each have 6 fields. The first table named “blocks” has fields to record what type of lego piece it is using the fields: block_id, size_in_dots_long, size_in_dots_wide, type, qty_available, colour. This will help by using the block_id as a foreign key in the table named “house_construction” which has the fields: house_part_id, start_dot_x, start_dot_y, end_dot_x, end_dot_y, block_id. Which identifies which blocks go where on the plane using the block_id as reference. The next step was to add some dummy data which needs to be inserted into the blocks table before it can be inserted into the house_construction as it needs the data to use for the foreign key. Once dummy data has been inserted into the database we needed to write the php script to display said data. To begin with I reused the connections script from the last unit and referenced it in my script. I then added a connection prepare line to take all the data from the house-construction table and store it. I then executed the script and assigned the variable “$data” to fetch all the data and put it in an array. Then i used an array loop for each value in data print the row name in order of: house_part_id, start_dot_x, start_dot_y, end_dot_x, end_dot_y.
I then tested the script by loading it on a localhost server and it printed the data and then to make it more pleasing to the eye i made it print the two start values on one line separated by a comma, as well as the end values.
I did not run into any errors during this unit but it was a fun learning exercise.
The purpose of this unit was to create a unity package that can be used on several unity projects with little modification to it to provide an authentication ability. the requirements to this was to have unity hub, unity 2019.4.2, notepad++, xampp server, and Microsoft Visual Studio community 2019 unity editor. With unity hub after installing the unity editor you go into unity hub into versions and click locate and browse your documents to find the installed editor of your choice which will then set it up in unity hub as a shortcut. To create the package we went into unity hub and made a new empty 3D project and created a new scene named login, on this scene we inserted two input fields and one button. The two input fields were for username and one was for password with the button being to submit. next we created a new script named “LoginScript” and then copy pasted an already constructed script into that file.We then had to copy and paste a php script named “loginsecure” into a new file in a new folder we created in our xampp directory and change the database name variable to the name of the database we created. We then had to change the URL variable to the php file in the csharp script. Once this is done we put the script onto the button and assigned the input fields to the script and assigned the OnClick function that is on the button to “LoginScript.LoginAc”. We ran the unity project to test if it worked which when presented with an already created account in the database came up with an error and when we inserted a new one there was no error. We then created a new scene named “Registration” and created four input fields and a button. These fields were for username, email, password, and confirm password with the button being submit. We crated a new script named “RegisterSystem” and once again copy pasted an already existed script into the file. We then copied another php script named “Regactsecure” into the same xampp directory folder and referenced the file in the csharp script. We encountered some errors in the php script at this point where we had to change the database name variable aswell as the database username and password as to actually sign into the phpmyadmin page and there was a line at the bottom of the code that did not have to be there and was causing an error so we removed it. We then in the unity project assigned the script to the burron and assigned the input fields and then in the onclick function set it to “RegisterSystem.Submit()” and then ran the unity project to test that if we inserted values for an account that did not exist yet it would insert it to the database we assigned but if we tried to do an existing account it would come back with an error. Some minor errors that we encountered was that we did not know the file directory for the php scripts at first which was solved quickly. This unit is sustainable as we are able to export this as a package an insert it into any future projects that we work on to save having to recreate it.
The purpose of this database is to create a simple and efficient system to order items and place them in a record to search for at a later time. The requirements that were needed for this was a paper order example, a spreadsheet for normalization, a document for database annotation, and phpmyadmin for creating the database itself. The steps to this is to first make a spreadsheet with all the data that is on the order form. Once this is done we must do normalization and make it more efficient without duplicate entries wasting space such as all of the client info. Instead make a second table with the added field of the user ID which will be unique without any two people having the same ID and put in the user info but not any of the product info which will be kept in a separate table with the user ID field instead of all of the client info. In this case we could take this one step further and make a third table that has all the product info with a product ID which will replace the product info in the second table reducing the total fields in the second table to four fields instead of the initial eleven fields. The database notation is done by first distinguishing what type of normalization level is being used (UNF, 1NF, 2NF, etc) and then stating the name of the table followed by a list of the fields used separated by commas in all lowercase in between two round brackets. In the case of being at a higher normalization level with more than one table separate them with a line and type the new tables name and repeat until all tables have been annotated. Once this was done we started up xampp and went to the phpmyadmin URL and created a new database with three tables with the appropriate amount of fields in each and then going into the designer tab and setting up relationships between the UserID and also the productID as foreign keys in the orders table to link between the three tables. The only issues encountered were that if you created the wrong primary key field we initially believed we cannot delete the primary key and we would be required to make a new field and delete the old one until we discovered that if we type in the SQL code tab
"ALTER TABLE `customers`
  DROP PRIMARY KEY;"
where the word “customers” is the table name desired which would result in the primary key being removed without having to delete and remake the field. To test that the database worked we inserted the data provided on the order form into the database doing the user and products before the order table.
Installing a test web server is fairly quick and easy as it has been streamlined to help aid users experience. To do this you will need a Windows Vista or newer operating system, you will also need a stable internet connection and enough space to install it. The test web server that we decided to use is xampp which to install first you must go to the website and click on the desired version that you want to install. Once done then run the app which will cause an error that says not to install the app to a server. Work your way through the install process using the instructions provided and choose the install desired install location and then wait for it to install. Once installed open the xampp control server and start Apache and MySQL by clicking start on both of them and then in your preferred Internet browser such as Chrome, or firefox type into the URL search bar “localhost/phpmyadmin” which will open phpmyadmin which can be used to create databases and tables to keep record of data which can be customized and used top your liking. To test if this worked run the app and see if it opens. One problem that we encountered was that we had to move the setup file out of the user files as it seemed to have issues accessing user files.
Installing a ghost image is a good idea to do if you are going to be using your computer a lot as it can help you restore your computer in the case of any corruption or lost data. The purpose for doing this is for that exact reason, to restore your computer to a certain point in time in which you created the image.The minimum requirements for doing this is at least windows XP and ghost installed with enough memory on the computer to install the image. the steps in order to install the ghost image is to start by shutting down your computer and turning it back on and pressing the respective button which is typically F12 in order to open the boot menu, click network boot, quickly scroll down to ghost.wim as you will have 4 seconds to do it, and put in the respective password. Once this loads exit ghost and type in the command prompt that pops up “ghost64 -ntexact” which will reopen ghost in which you follow the prompts of “local” and then to “disk” and finally click on “to image”. Select the drive that is closest to the drive that has the operating system installed on it. Select where you want to save it, and name the image. This will cause a pop up that asks if you want to compress the file which we pressed no on, and then click yes. Once the image has installed click continue. Once this is done all that is needed is to quit ghost and then type in the command prompt “exit”. To test if this work go and check if the image files are in their chosen location.
Reinstalling windows is a fairly streamlined progress in today’s age of technology where everything has been made more accessible to the average user of a computer. Possible reasons to reinstall windows back to the original state is so that if there are any viruses or issues such as your computer being slow that cannot otherwise be solved easily. This can fix said issues by wiping the entire computer and then reinstalling the operating system. To do this all you need is to have access to an account that has administrative permissions. To restore windows all that is required is to go to the settings app on your computer and click on “Updates & Security” and then on “Recovery” on the left hand side of your screen. Once on this screen click “Get started” and then choose the option you want where in this case we chose to remove everything, click next, and then click on reset. Once this is done you will have to wait for the windows to install. Once windows is installed go ahead and follow the steps to set up windows on your computer which windows will guide you through it such as user name and password or if you want Cortana or not. To test if this worked it will come up with the windows 10 layout and if it did not work then it would not show the regular layout.
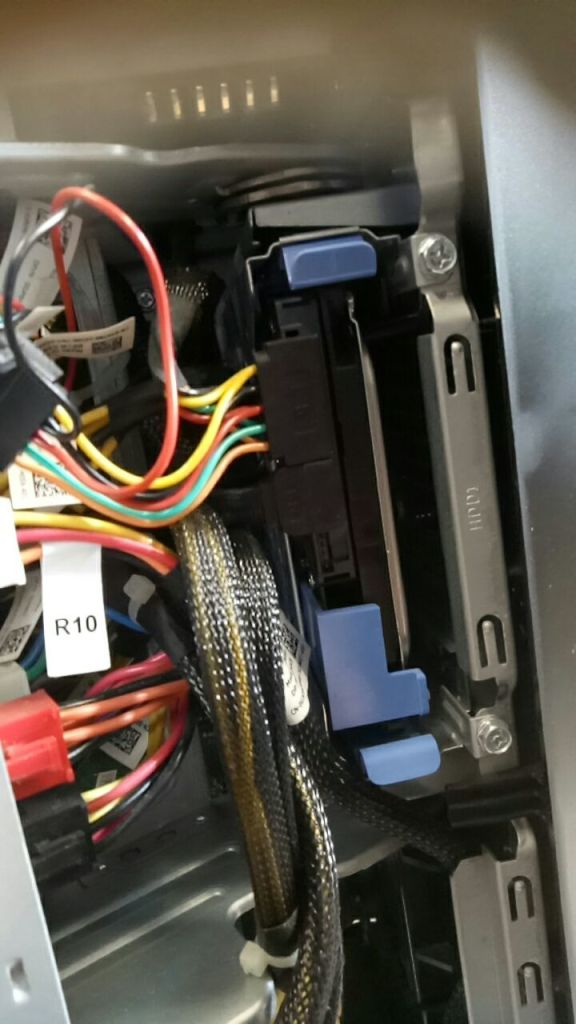
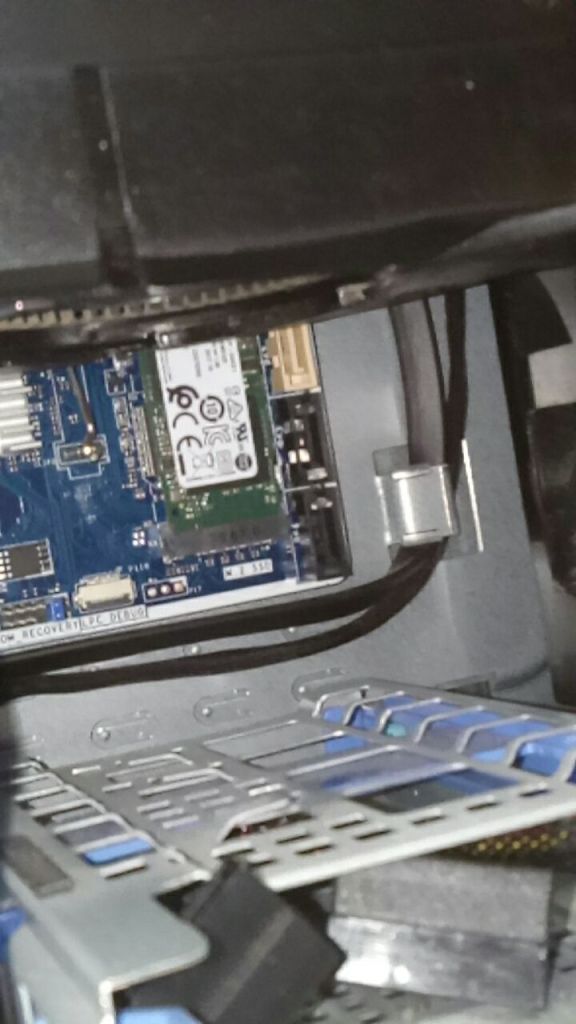
The requested task was to open up the Alienware computer units and find what drive configuration is in the unit. To complete this task the tools used was just a simple Phillips head screw driver to unscrew the basic screws. This task only required one size of screwdriver as the screws were the same size. The WHS that was used is that we ensured that there was no power in the unit by holding the power button until the fans stop moving which means there is no remaining power. After this we unlatched the side of the computer case and proceeded to see if the SATA drive was there properly which it was and then we checked if the SSD was attached to the motherboard aswell which it was.
To ensure quality we organised parts so that we did not lose the parts while taking it apart, then while plugging it back in we organised the cables and then powered it on to test if it still worked which it did.
To care for the computer at hand the first task is to reset the BIOS password as it has been forgotten. To do this we must place a shunt on top of the BIOS pins which will run a program to reset the password.
Once this was completed it was discovered that the date and time were failing which in order to fix this we need to replace the CMOS battery and then place the shunt on to the power pins which will restart the system which allows for testing of the changes.
It was later found that there was an unreliable display so in which we must remove the graphics card from PCI_E4 and latch it onto PCI_E1 which should resolve the issue of a faulty display as it is in a different port that may not have the same issues.
The next issue found was that the system was overheating, to fix this issue we used a compressed air can to spray the dust off of the fan to reduce resistance of the fan allowing for proper cooling of the system.